How to Set Up a Furrion Backup Camera
To set up a Furrion backup camera, mount the camera on the pre-wired bracket, connect its pigtail to the Furrion port, then pair the monitor and adjust the guidelines. Power the monitor from the cab, check the image in daylight and at night, and set the view before you tow.
On this page (8 sections)
- What comes in a Furrion pre-wired camera kit?
- How do you mount the camera on a Furrion bracket?
- How do you connect the pigtail to the pre-wired port?
- How do you pair the monitor with the camera?
- Why is the wireless signal weak or dropping?
- How do you adjust the guidelines and image settings?
- How do you test the setup before towing?
- Which Furrion pre-wired camera fits your setup?
To set up a Furrion backup camera, mount the camera on the pre-wired bracket, plug its pigtail into the Furrion port, then pair the monitor and set the guidelines. Power the monitor from the cab and check the image in daylight and darkness before you tow.
The whole job is a bracket, a plug and a pairing step, not a full wiring project. The steps below cover each part in order.
What comes in a Furrion pre-wired camera kit?
A Furrion pre-wired kit gives you the camera, a mount bracket, a pigtail wire and a monitor, plus the antennas and power cable for the monitor. The pre-wired RV already has the port and the housing in place, so the kit supplies only what plugs into it.
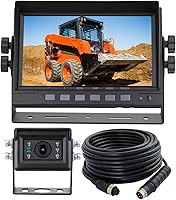
The Yakry Y27 kit includes the Furrion bracket and pigtail wire for RVs, 5th wheels, travel trailers, campers and buses. Its camera pairs with a 7 inch 1080P monitor that accepts up to 4 cameras.
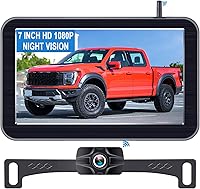
The AMTIFO kit ships with a Furrion mounting bracket adapter plate and pigtail wire, plus a 7 inch touch key display, a test wire and a cigarette lighter plug. The DVKNM system includes a 7 inch IPS touchscreen monitor, a rear camera, a fan-shaped bracket and a suction cup bracket, plus a 12V power cable for non-Furrion setups.
Check the box against your RV's port before mounting anything. The bracket needs to match the housing on your rig, and the pigtail needs to reach the port without strain.
A kit that includes both parts saves a separate order. If your RV is not pre-wired, our guide to the best wired backup camera covers systems that run a cable instead.
How do you mount the camera on a Furrion bracket?
Mount the camera level and tight on the bracket, with the lens pointing down and slightly toward the ground behind the trailer. A level camera keeps the horizon straight and makes the guidelines easier to set.
Step 1: Position the bracket
Line the bracket up with the Furrion housing and the pre-wired port. The pigtail wire should reach the port with a little slack so the cable doesn't pull when the door moves.
Hold the bracket in place and check that the camera lens clears the housing edge and isn't blocked by a light bar or ladder.
Step 2: Fasten and seal
Tighten the screws evenly so the bracket sits flat against the housing. A bracket that rocks will let water in and blur the view over time.
Confirm the camera is seated firmly, then run the pigtail through the port opening without pinching it in the door seal. The Yakry camera carries an IP69K waterproof rating, and the AMTIFO unit uses all-metal construction with an IP69 waterproof rating, so the housing is built for rain and road spray when it's sealed properly.
Step 3: Check the angle
Stand behind the trailer and look at where the camera points. The Yakry lens has a 150 degree field of view, and the AMTIFO lens also lists 150 degrees.
A view that shows the bumper and the ground just behind it is the useful range. Aim too high and you lose the near ground; aim too low and you lose the lane behind you.
The DVKNM camera lists a 120 degree field of view, which is narrower, so its mounting angle matters more.
How do you connect the pigtail to the pre-wired port?
Connect the pigtail by pushing the connector fully into the Furrion port until it seats, then check that the camera powers on. A half-seated plug is the most common reason a pre-wired camera stays dark.
Match the connector shape to the port before pushing. The Furrion pre-wired port is keyed, so the plug only fits one way.
Twist the locking ring or press the latch if the connector has one, then tug gently to confirm it holds. If the camera doesn't power up, pull the plug, look for bent pins or debris, and seat it again.
A test cord, like the one AMTIFO includes, lets you confirm the camera works before you climb up to mount it. For a non-Furrion RV, the DVKNM kit's 12V power cable runs to a reversing or running light circuit instead.
Our guide to backup cameras for box trucks covers the wiring routes on larger vehicles.
How do you pair the monitor with the camera?
Pair the monitor by powering the monitor first, then the camera, and letting the two find each other on the same channel. Most kits pair automatically once both ends are on.
Turn the monitor on with the cab power or the cigarette lighter plug. Then switch on the camera power at the rear.
The Yakry monitor is a 7 inch 1080P screen, and the AMTIFO display is a 7 inch touch key screen. Both should show the camera image within a few seconds.
If the screen stays blank, press the channel button to cycle through the inputs. The DVKNM system uses a 7 inch IPS touchscreen with split-screen support for up to 4 cameras.
Keep the monitor close to the camera for the first pairing, then move it to the cab. Pairing is easier when the two units are near each other and the antennas are clear.
Why is the wireless signal weak or dropping?
A weak signal usually comes from a loose antenna, a metal wall between the units, or too much distance. Tighten both antennas and check the range before blaming the camera.
The Yakry Y27 uses a dual-antenna design that reaches up to 825 ft in open areas and about 320 ft on a vehicle. The AMTIFO unit uses a 2.4-GHz system with dual antennas and the same 825 ft open-area figure and 320 ft working range.
The DVKNM system reaches about 328 ft in open areas. Those numbers assume a clear line; an RV body and a long trailer cut into them.
Route the monitor's antenna away from metal and keep the camera antenna upright. If the image still freezes, move the monitor forward to shorten the distance between the units.
Our guide to backup cameras for pickup trucks covers signal issues on shorter rigs.
How do you adjust the guidelines and image settings?
Adjust the guidelines on a flat surface with a straight reference line, then set brightness and contrast to suit the light. The guidelines should line up with the trailer's width, not with the lane.
Park with the trailer's rear corners over a painted line or a straight edge. Open the monitor menu and turn the guidelines on.
The Yakry system lets you switch the backup lines on or off, and the AMTIFO menu turns the guidelines on or off and adjusts them up and down. Move the lines until they match the trailer sides.
Then set brightness and contrast for the time of day you tow most. The Yakry system also offers a reversing/rear view mode and a full-time constant view, so you can leave the camera on while driving.
Check the night vision after dark; the Yakry camera uses 8 infrared lights, the AMTIFO unit offers up to 20 ft of infrared night vision, and the DVKNM camera uses 3 infrared LEDs.
How do you test the setup before towing?
Test the setup by checking the image in daylight, at night, and while the trailer is hitched, then confirm the camera stays on over a short drive. A view that works in the driveway can still fail at highway speed.
Start with the hitch. Back up to the trailer and watch the monitor as the coupler lines up with the ball.
The Yakry camera's 1080P resolution and 150 degree view help here, and the AMTIFO unit's 1080P sensor does the same. Then drive a short loop and check that the image holds without freezing.
The DVKNM system uses loop recording when you insert an SD card, so you can replay the drive and see what the camera caught. The Yakry and AMTIFO units also offer recording functions.
If you tow a taller rig, our guide to backup cameras for SUVs covers the mounting angles that work on smaller vehicles.
Which Furrion pre-wired camera fits your setup?
Pick the Yakry Y27 if you want the widest set of features on a Furrion mount, with a 4-channel 7 inch 1080P monitor, dual antennas and IP69K waterproofing. The AMTIFO kit is the choice when you want an all-metal camera and a touch key display with a test cord for checking the camera before mounting.
The DVKNM system suits a 12-36V vehicle and a touchscreen monitor with split-screen support for up to 4 cameras.
Setting up a Furrion backup camera comes down to four steps: mount it level, seat the pigtail in the port, pair the monitor, and set the guidelines. Do those in order and check the image before every trip.
A camera that's mounted right and paired cleanly is the difference between a clear view behind the trailer and a guess at the bumper.
Frequently asked questions
Can I set up a Furrion backup camera without drilling?
Yes, if your RV came pre-wired for Furrion. The bracket and pigtail wire mount to the existing housing and port, so no new holes are needed.
A non pre-wired RV needs a power cable routed to a reversing or running light circuit.
Why won't my Furrion backup camera monitor pair?
Check that both antennas are tight and the monitor is powered before the camera. Keep the two close together for the first pairing, then move the monitor to the cab.
A weak signal often comes from a loose antenna or a metal wall between them.
How far does the signal reach on a Furrion pre-wired camera?
The Yakry and AMTIFO cameras reach up to 825 ft in open areas and about 320 ft on a vehicle. The DVKNM system reaches about 328 ft in open areas.
Walls and the length of the RV shorten that range in practice.
Should the backup camera stay on while driving?
Yes, most Furrion pre-wired systems can run in a constant rear-view mode rather than only in reverse. That gives you a live look at traffic behind the trailer while you tow.
Switch back to reversing mode if you only want the view when backing up.
How do I set the backup guidelines on a Furrion camera?
Park on a flat surface with a clear reference line, open the monitor menu, and turn the guidelines on. Adjust them until the lines match the width of your trailer.
Check them again after loading so the lines still line up with the sides.
What should I check after mounting the camera?
Confirm the camera is level and tight, the cable is clear of the door seal, and the image is not upside down. Look for glare or a blocked view in daylight, then check the night vision.
Tighten any loose screws before you drive.