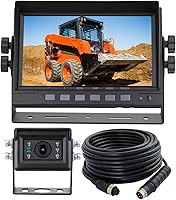
How to Set Up Reverse Camera Lines
To set up reverse camera lines, park on a flat surface facing straight ahead, turn on the guidelines in the monitor menu, and adjust the camera angle until the lines frame your bumper's width. Then compare the lines to a curb or marked bay and fine-tune the position.
On this page (10 sections)
- What do the colored reverse camera lines actually mean?
- How do you turn the guidelines on in the monitor menu?
- How do you aim the camera for accurate lines?
- How do you line up the width against a real curb?
- When should you choose dynamic lines over static ones?
- What causes guideline drift after the camera is installed?
- Which camera and monitor setups make line adjustment easier?
- How do you check the lines in a real parking spot?
- How should you set up reverse camera lines for a box truck?
- Which setup would I pick?
To set up reverse camera lines, park on flat ground, switch the guidelines on in the monitor menu, and aim the camera so the lines frame your bumper's real width. Then back up to a curb or a marked bay and adjust the angle and line width until they match what you see.
The setup is mostly about matching two things to your vehicle: where the camera points and how wide the lines sit on the screen. Once those line up, the color zones become a useful parking aid instead of decoration.
What do the colored reverse camera lines actually mean?
The lines are a distance and width reference drawn over the camera image. Most systems use green for far, yellow for caution and red for close, though the exact distance depends on how the camera is mounted and adjusted.
The two side lines follow the predicted path of the vehicle as you back up. The horizontal bands across them mark how much room you have left before the bumper reaches an obstacle.
A wide angle lens bends the outer edges of the picture, so the lines are drawn curved to compensate. That means the lines are only as accurate as the setup.
A camera tilted too high pushes the red band far down the screen, and a camera tilted too low pulls it up close. The camera's field of view matters too: a 170-degree fisheye shows more than a 120-degree wide angle, and the same overlay looks different on each.
How do you turn the guidelines on in the monitor menu?
Open the monitor's settings menu and look for a parking lines, guidelines or grid option. Switch it on, then save the setting before leaving the menu.
On many monitors the toggle sits in a camera setup submenu, separate from brightness and mirror settings. If you have more than one camera input, check that the lines are enabled for the reversing channel.
A few units only show the overlay when the monitor receives the reverse trigger signal, so confirm the trigger wire is connected.
What to check if the lines won't appear
If nothing shows, first confirm the monitor supports an overlay at all; some basic screens don't draw lines. Then check the trigger wire and the camera input.
A loose RCA connection can drop the image or the overlay while the rest of the monitor still works. If the lines show but look crooked, the camera body is likely twisted in its mount.
Straighten it so the lines run parallel to the bumper edge in the picture.
How do you aim the camera for accurate lines?
Loosen the camera bracket and tilt the lens until the bumper edge sits near the bottom of the frame, with a little of the ground behind the vehicle visible. Tighten it and check the lines against the ground.
Aim too high and the lines float over the horizon, so you can't judge the last foot of travel. Aim too low and you lose sight of what's further back.
The sweet spot shows the bumper across the bottom, the ground behind it and enough of the scene to see a person or a post. Check the mounting height too, because a tailgate or trunk handle camera sits lower than a roof-mounted one, so the lines land differently.
After moving the camera, expect to redo the width adjustment.
How do you line up the width against a real curb?
Back slowly toward a straight curb and stop when the red band meets it. Step out and compare where the lines sit to where the tires and bumper actually are.
Repeat on the other side. If the lines are wider than the vehicle, you'll stop short of obstacles that are actually close.
If they're narrower, you risk clipping something at the corner.
Adjust the line width setting in the monitor, or move the camera sideways if the mount allows it. A marked parking bay is an easier test than a curb, so park straight in the middle of the bay and see whether the lines track the painted edges.
A cone or a tall bin in an empty lot also works for judging distance.
When should you choose dynamic lines over static ones?
Choose dynamic lines if you want the overlay to bend as the vehicle changes direction. Static lines stay fixed and only show width and distance bands; dynamic lines curve to follow the predicted path.
Dynamic lines help most in tight lots where the wheel is turned before you start reversing. They show where the rear will swing, not just how wide the car is.
Static lines suit simple straight-back parking and are less distracting for some drivers.
The GreenYi camera for BMW uses a moving trajectory overlay that changes direction when the car turns left or right. It works without a steering wheel signal or an extra canbus module.
The maker says you can turn the overlay off by cutting the switcher cable on the camera.
It's a 960 by 720 CCD camera with a 170-degree fisheye lens and IP68 waterproofing. It needs an RCA monitor and a trunk size that matches the camera body, so measure before ordering.
What causes guideline drift after the camera is installed?
Guidelines drift when the camera moves in its mount, the monitor's line width setting changes, or the load in the vehicle alters its ride height. A loose bracket is the most common cause.
Check the bracket screws and any adhesive pad first. A camera knocked slightly out of line shifts the whole overlay, even if the lens still looks straight.
Then check the menu in case a reset changed the line width.
Loading matters more on pickups and vans. A heavy load can change the rear ride height enough to tilt the camera's aim.
If you carry different loads often, pick a middle ground and recheck when the vehicle is loaded for a big job.
Why the trigger wire matters for the lines
If the guidelines only appear when you shift into reverse, the monitor is switching to the camera feed through the trigger wire. The guide to hooking a backup camera to your reverse lights covers that connection.
Which camera and monitor setups make line adjustment easier?
Setups with an on-screen menu and adjustable line width are easier to tune. A monitor with parking guidelines in its own settings, plus a camera you can tilt in its bracket, covers most of the job.
Wireless kits skip the long cable run and keep the line overlay in the monitor. The ZEROXCLUB kit pairs a 7-inch IPS screen with a 1080p camera and includes adjustable parking guidelines in the screen menu.
It has a 120-degree viewing angle with IP69k waterproofing.
Its 2.4GHz wireless link has a rated range up to 100 feet, so both units still need wired power. On GMC, Chevy, Ford and RAM vehicles with PWM power, the maker recommends a 7-way adapter or a 12V PWM filter to steady the signal.
For a truck build, see our picks for a backup camera for pickup truck.
When a longer cable helps
If the camera and monitor sit far apart on a long vehicle, the cable run can be too short. The EWAY 20ft RCA cable extends the video feed and carries a trigger wire for the reverse signal.
It has nickel plated plugs and double shielding to cut interference. A female-to-female coupler and a DC power lead are included.
The 20-foot length suits mid-size cars, SUVs, sedans and pickups, so measure your route before buying.
How do you check the lines in a real parking spot?
Use one marked bay as your test track and back in three times. Note where the red band meets the paint each time and whether the car ends up centered.
Try a parallel spot next. The side lines should track the curb without crossing it, and the red band should stop you with a little gap.
If the car ends up crooked, the camera is aimed to one side and needs a nudge.
Repeat the test in low light if you park at night. The overlay is the same, but the ground is harder to see.
A backup camera is a parking aid; mirrors and a head check still matter.
How should you set up reverse camera lines for a box truck?
Box trucks need a lower camera aim and wider lines because the body is tall and the rear corners sit far from the lens. Mount the camera at the top of the rear door and aim it down so the lines land just behind the bumper.
Check the width against the box's real corners, not the cab. The lines should sit at or just inside the outer edge of the cargo box so you can see both corners in tight loading docks.
For more on wiring and mounting, read our picks for a backup camera for box truck.
If you're fitting a pre-wired camper or trailer rather than a truck, the process differs slightly and our guide to setting up a Furrion backup camera covers those mounts and connectors.
Which setup would I pick?
For most drivers, I'd pick the GreenYi camera if your vehicle accepts a trunk handle mount and an RCA monitor, because the moving trajectory lines handle tight turns without extra wiring. Set the camera angle first, then the line width, then test against a curb.
For a wireless build, the ZEROXCLUB kit puts the guidelines in a 7-inch screen menu and skips the long cable. Add the EWAY extension cable when the run from a rear camera to the dash is longer than the cable in the box.
Expect one round of fine-tuning after the first real park. Check the aim whenever the camera is bumped or the vehicle carries a very different load.
Frequently asked questions
Do reverse camera lines work without a steering wheel sensor?
Some do. The GreenYi trunk handle camera moves its trajectory lines when the car changes direction, without a steering wheel signal or extra canbus module.
Static lines never move at all, whatever the wheel is doing.
Why do my guidelines look wider than the car?
The camera is tilted too high or the guideline width setting is off. Lower the lens a little and pick a narrower width in the monitor menu, then recheck against a curb.
Can I turn the guidelines off?
Yes. Most monitors have an on/off toggle in the camera settings.
On the GreenYi camera, cutting the switcher cable on the unit turns the dynamic lines off.
How far apart should the guide lines be at the bottom of the screen?
They should land close to your rear tires' outer edges on the ground. That makes the bottom width match the real width of the vehicle you are parking.